How to mine Ravencoin
I just wanted to do a quick post of a beginners guide on how to mine Ravencoin. Ravencoin has a great community with a lot of helpful people. You can mine Ravencoin on a standard PC with a single video card, or a specialized mining rig. I am currently doing both so I will run through both of my setups below. If you would like more info on the Ravencoin project you can find it at ravencoin.org
Disclaimer: This article is not financial advice, or instructions on how you should do anything, it is for entertainment purposes only.
These are the 3 basic steps to mine Ravencoin. (These steps also pertain to other coins you might mine)
- Download a wallet to store your coins, and this way you will have an address to mine to.
- Get a PC with a somewhat decent video card, or a specialized mining rig. (I will go over both options)
- Download some mining software to run on your machine to start mining, and add you address and pool info.
That’s it, its really simple to get started at a basic level. To keep this brief I will not go into details such as encrypting and backing up your wallet and private keys. But I do recommend you do this. A lot of people have lost their coins due to no backup, or being stolen by someone getting their private key. Remember to keep them safe.
So lets get started….
Step 1. Getting a wallet.
There are a few options for wallets, But I prefer to use the official wallet from the Ravencoin.org website (The Ravencoin QT wallet). Once on the Ravencoin.org homepage,scroll down until you see the download links and click on download Binaries. This will take you to the Ravenproject GitHub. Then download the wallet for your operating system.
In my case I downloaded the Win64 setup version. Once downloaded I ran it and went through the installation process. When you run it and sync up the first time, you will notice it will take a few hours to fully sync. This is normal when you first run it. Once sync’d up you can get your receiving address by going into FILE-> Receiving addresses
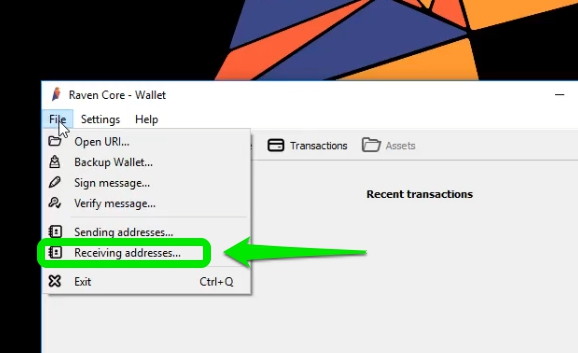
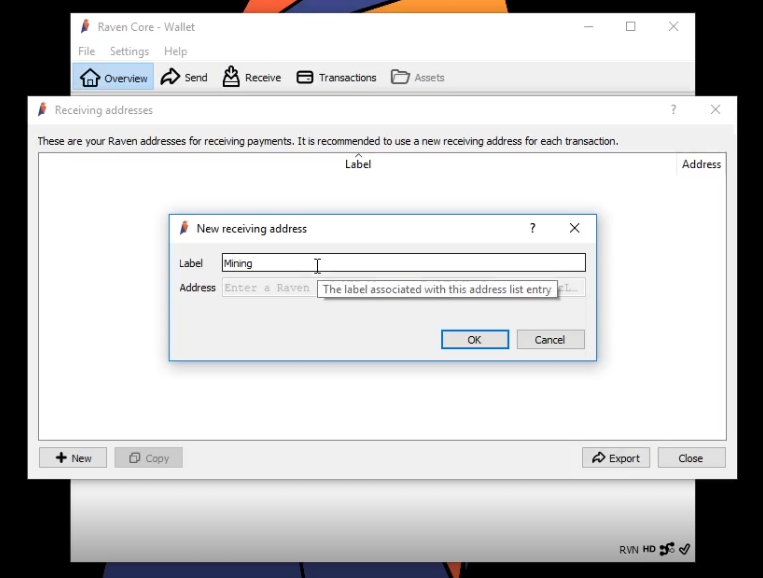
Click on the New button at the bottom to get a new receiving address. You can add a label as well if you like.
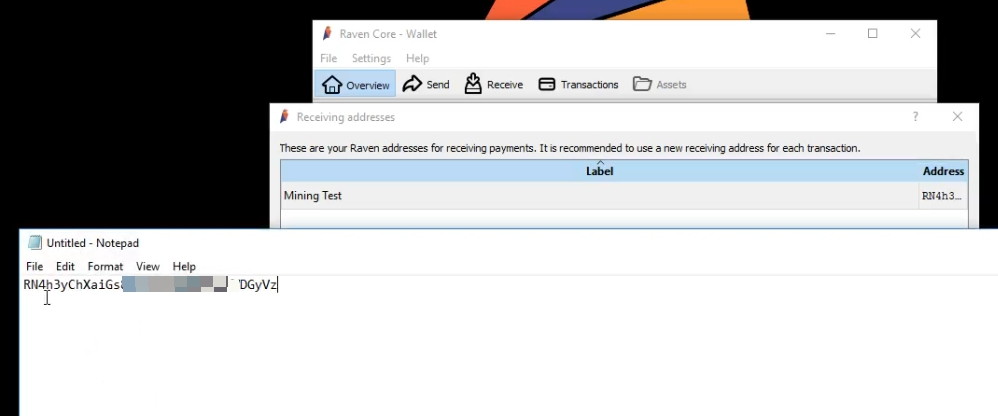
You will then get a new receiving address. This is your public receiving address to put into your mining software. You can go ahead and copy the address and paste it into notepad for future use. I blocked out part of my address below in the picture, but since it was a public receiving address showing it to someone would not allow them to get my coins. It would just allow them to see my balance and transactions. This is the address you will put into your mining software so the coins you mine will go into your wallet.
Ok, That’s it, we got a Ravencoin address. Now we can move onto Step 2.
Step 2. Your PC or Mining Rig.
For a mining ravencoin you have a couple choices. I started with just mining on one of my Desktop PCs and my son on his desktop pc when he wasn’t gaming. Then after a while I decided to build a small mining rig. For the record I have not had any issues yet with failing video cards or PC components due to mining, but as with anything this is a possibility.
Mining also uses electricity and generates some good heat as your PC is running hard to solve those algorithms to get those coins. People tend to mine 24/7 so it does generate heat and increase your power bill. For this reason I would not recommend using a laptop to mine as they tend to run warm anyways and not sure if the heat might harm it.
Choosing a GPU
I think the biggest factor in mining Ravencoin is the video card (GPU). Basically the better the GPU, the more coins per day you can mine. (also it seems the better the GPU the more power it uses). Right now Nvidia cards seem to be better at mining Ravencoin then AMD, but they both will work. You can get a rough estimate of how many coins you can mine per day by GPU type if you visit sites like whattomine.com and ravencalc.xyz.
Just remember this rate they show you is not a guarantee, and as more people mine the coin and the difficulty changes we can assume you will end up mining less and less coins over time. I think most people are hoping that the value of the coins increase over time as well. I think one of the best cards right now for Ravencoin is the GTX 1080ti from the stats I have seen.
PC desktop option –
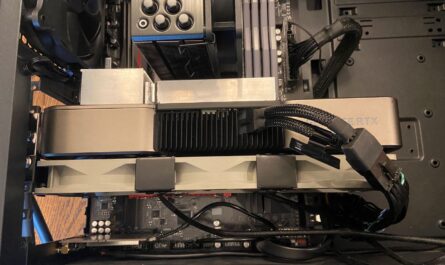
This is the easiest option and how I started. To get started I just tried out the mining software on my existing desktop PC to see how it ran. No extra equipment was needed. I had a GTX1060 which was reasonably priced card and very good for raven mining ( They run ~$230 to $330 new, but I have seen them for as cheap as $120 used locally for the 6GB model if your on a budget). But you can use lower end video cards as well. In this example I am using an old GTX 750ti in an old desktop I had. So if you have a PC and you just want to test it mining your done… You can just go to step 3 and get the mining software and try it out.
Mining Rig option –
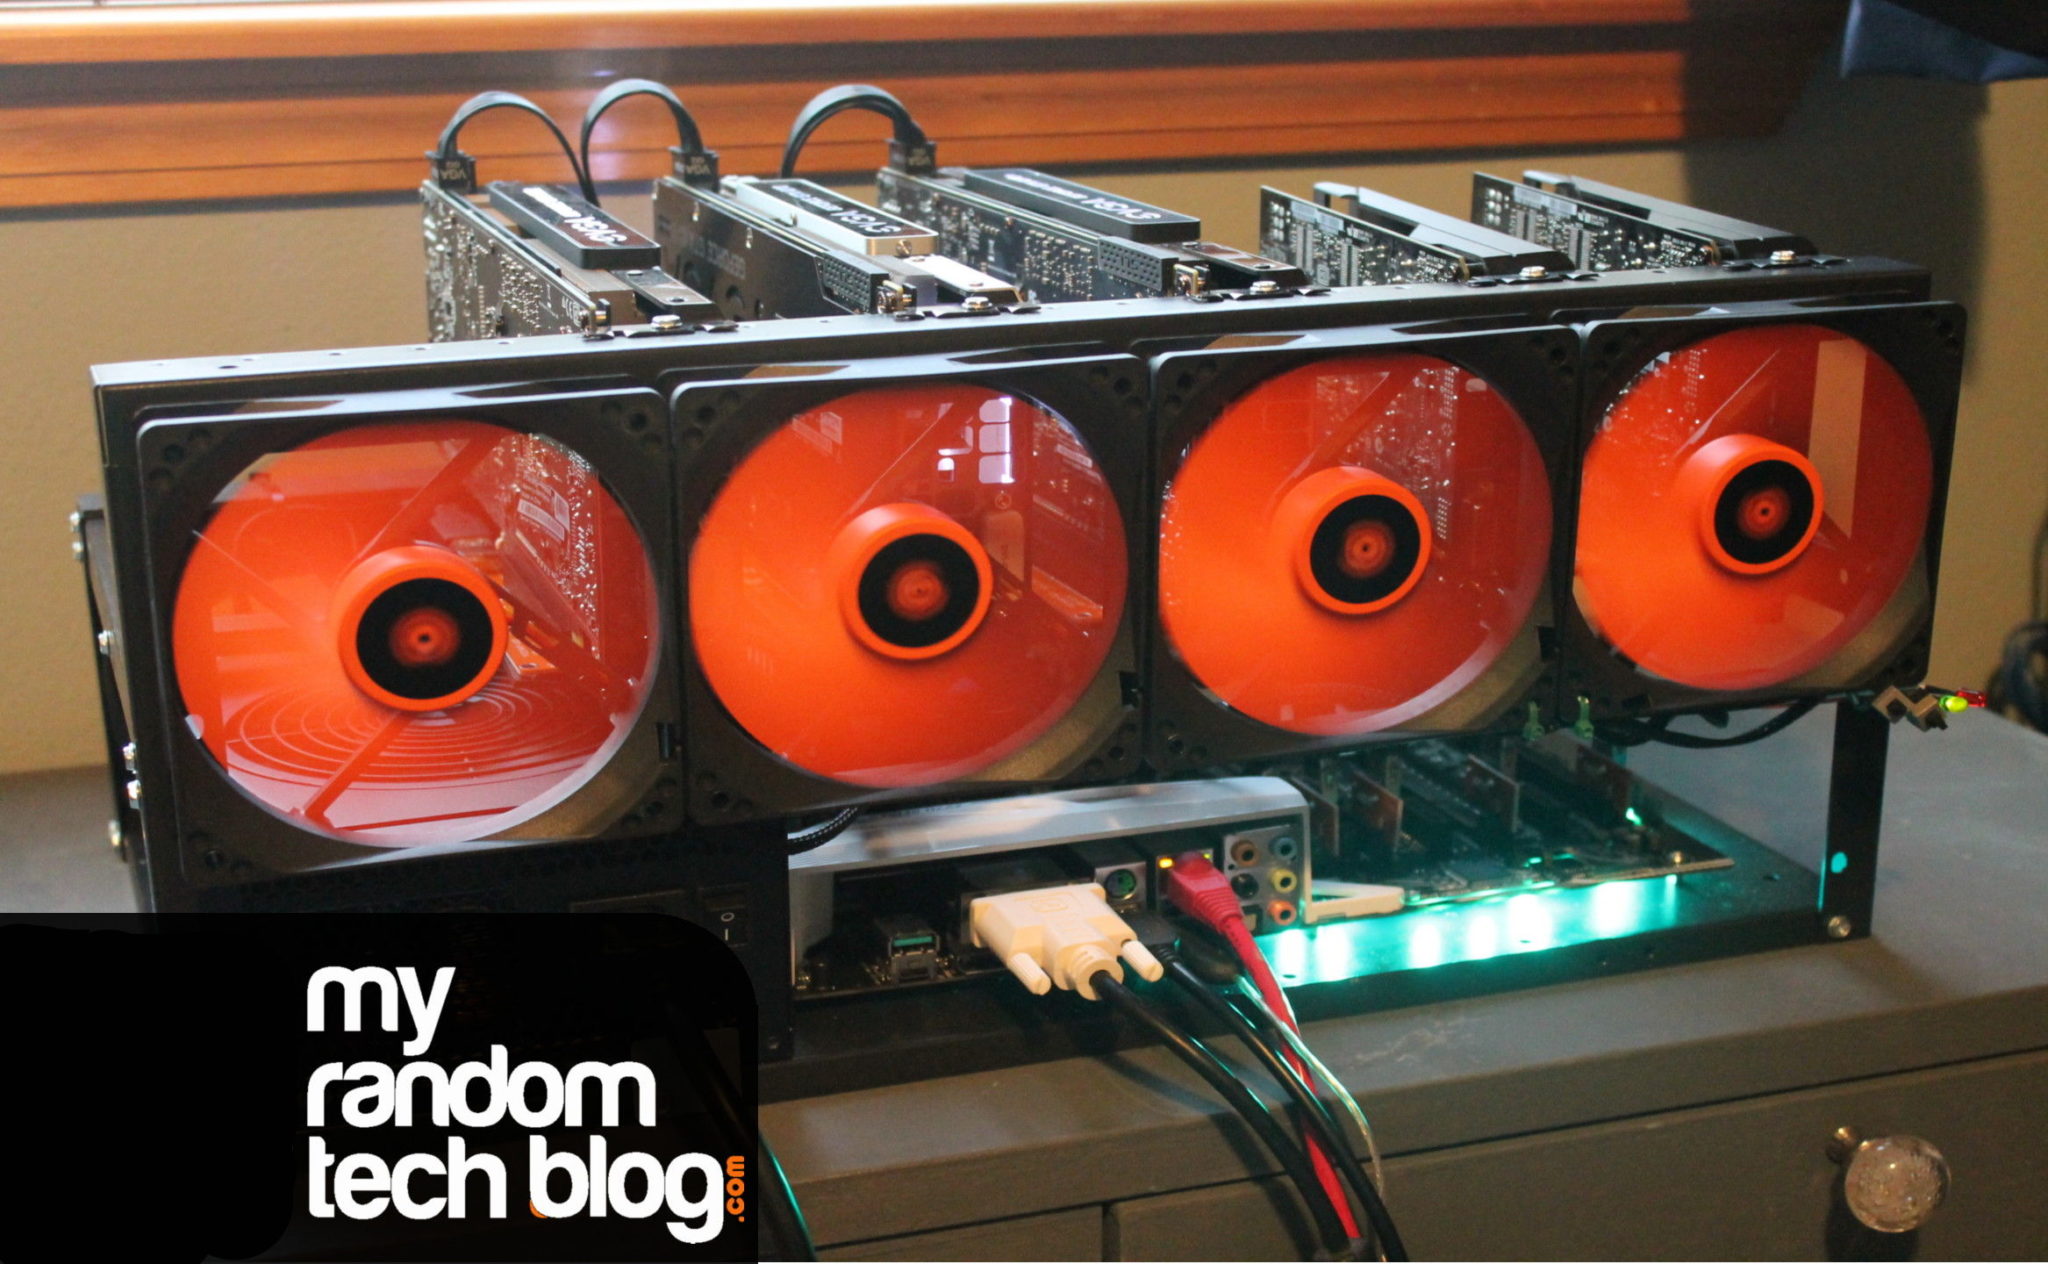
Basically this is just a PC that has multiple Video cards (GPUs) on it. Different motherboards can handle different amounts of video cards. You use what’s called a riser cable to add additional video cards to your PCIe slots. The usually are set up in an open air frame. Here is a list of my mining rig parts I am using right now. One thing to note is that the more GPUs you use the bigger power supply you will need. I am using a 1,000 watt power supply for the 6 GPU’s below. My mining rig runs around 60 MH/s with the cards listed and consumes around 600 watts with most cards running at %65 power.
PARTS LIST:
Here is my parts list for my dedicated mining rig in case you were interested:
ASUS Prime Z270-A
![]() WD Blue 3D NAND 250GB PC SSD – SATA III 6 Gb/s M.2 2280 Solid State Drive – WDS250G2B0B
WD Blue 3D NAND 250GB PC SSD – SATA III 6 Gb/s M.2 2280 Solid State Drive – WDS250G2B0B![]()
Intel BX80662G4400 Pentium Processor G4400 3.3 GHz FCLGA1151![]()
Patriot Memory DDR4 4GB 2133MHz – PVE44G213C4GY![]() (I have two sticks)
(I have two sticks)
Warmstor 2 Pack 2 Pin SW PC Desktop Power Cable on/off Push Button ATX Computer Switch Wire 60cm![]()
Ubit 12-PCS PCI-E Riser ![]() I only bought 6 of these, not a 12 pack.
I only bought 6 of these, not a 12 pack.
EVGA 1000 GQ, 80+ GOLD 1000W, Semi Modular, EVGA ECO Mode, 5 Year Warranty, Power Supply 210-GQ-1000-V1![]()
Video cards:
EVGA GeForce GTX 1060 6GB SSC GAMING Graphics Card 06G-P4-6267-KR![]()
EVGA GeForce GTX 1070 SC GAMING Graphics Card 08G-P4-6173-KR![]()
EVGA GeForce GTX 1070 Ti SC GAMING 08G-P4-5671-KR![]()
EVGA GeForce GTX 1060 SC 3GB 03G-P4-6162-KR
MSI Gaming GeForce GTX 1060 6GB (GTX 1060 ARMOR 6G OCV1)
EVGA 750ti (A very old card 🙂 Averaging around 2,500 MH/s but can spike to 3,300 MH/s
Frame and Fans:
AAAwave The PAN 6-8GPU compact mining frame
AAAwave silent 120mm fans
STEP 3 . Mining software
The mining software you choose will be dependent on which type of video card (AMD or NVIDIA) and your operating system you are using. I am using Windows for all my PC’s so I will go through those options. But they also have versions for Linux.
Currently I am using Windows 10 as the OS for all my PC’s and my mining rig. You have a choice of quite a few different mining software programs. Ravencoin uses the X16r algorithm so you want to make sure you use mining software that supports this. Some software is open source and some is not. I have tried the following versions of mining software below recently.
Due to my fear of closed source software and not knowing what is going on. I only use the closed source software on my mining rig which has no personal info and does not have my wallet loaded on it. For my PC I chose to use open source software. I do not know if any of the software below is malicious or not, but wanted to mention that aspect. I find that a lot of mining software triggers my antivirus software so use at your own risk.
Mining software I have tried recently:
T REX 0.6.3 – Nvidia miner – Closed source software. It seems to give me great rates, appears to be slightly better then zenemy 1.17 but I haven’t ran it as long to be sure. Also it did crash on me once, not sure if it is as stable a zenemey which has never crashed on me. Has a 1% dev fee. But the downside is it is closed source. I got the download link from the bitcoin talk website here for testing. I am currently still testing this on my mining rig.
Zenemy 1.17 – Nvidia miner – Closed Source. Has 1% dev fee. Z enemy was very stable and I got a great rate. I got the download link from the bitcoin talk website here for testing. But again, downside is its closed source.
Nevermore v0.2.3 – Nvidia Miner – Open Source – I use this one on my PC right now. 1% dev fee, but you can compile it yourself and remove that if you want. I downloaded it from GitHub here.
Avermore v1.4.1 – AMD miner – Open source. – I used this when mining with my RX570. It worked great and was very stable. Not a lot of options at the time when I was looking for AMD x16r miners. You can get download info here from bitcointalk, or directly from Github here.
Download and configure
Once you download the mining program you will need to add your wallet address and mining pool information into the config.
First you need to chose a mining pool that you will mine on. This is because you only get paid when you solve a block. With so many people mining you might not find a block for a LONG time. So people mine in a pool together so when one person finds a block the group shares the reward. There are different ways of sharing and I will post another article on that later. But for now you need to pick a mining pool.
Here are the stats on pools and what there combined hashrate is from their miners in case your interested https://ravencoin.network/pools most pools will have a section called getting started that will show you how to configure your miner.
For a pool I use ravenminer.com , So In this example I will show you how I set up my pc with the nevermore miner using the ravenminer.com mining pool.
Config example:
When you go to the ravenminer.com homepage they will give you an example of how to set up your configuration in your miner. It will look like this. You will need to modify it with your information. I will show how I did this below.
Example:
“-o stratum+tcp://us.ravenminer.com:4567 -u <WALLET_ADDRESS> -p worker1”
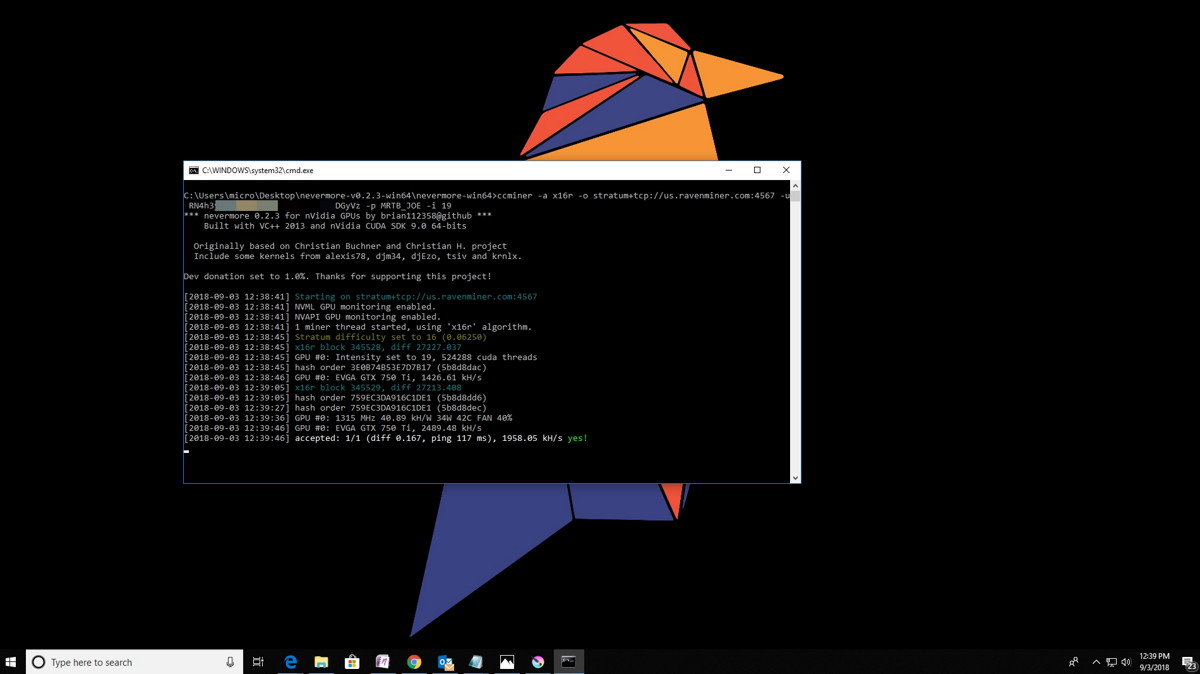
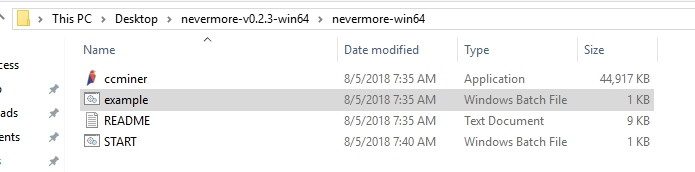
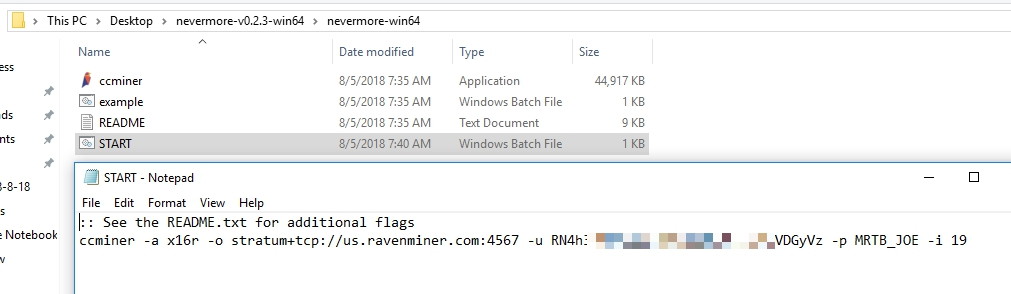
In the folder I downloaded the Nevermore software, I need to create a bat file. Basically this is just a text file that I save in notepad with the file extension of .bat When I run this .bat file it will start up the miner. I named my file START.bat , Nevermore also includes an example of what it should look like.
This is what my START.bat file contains. (That is not really my raven address, just an example as I changed some digits So please don’t send any coins as a donation or anything to the address, not that anyone would, but who knows 🙂 )
:: See the README.txt for additional flags
ccminer -a x16r -o stratum+tcp://us.ravenminer.com:4567 -u RN4h3yChXaiHFDHSFHDGWKDFHEFUHGyVz -p SUPERDUPER -i 19
FIELD Examples
Let me clarify a few fields. You can view the software README file for better detail.
-u = username, your ravencoin address is used here for ravenminer.com
-p = password for mining server, raven miner uses this to identify your worker on their website.
-i = intensity , This is GPU intensity, you can raise or lower this. I use 21 for my 1060s, and 1070s, but in this example its 19 as I am using my very old GTX750ti video card.
Here you can see my file and contents.
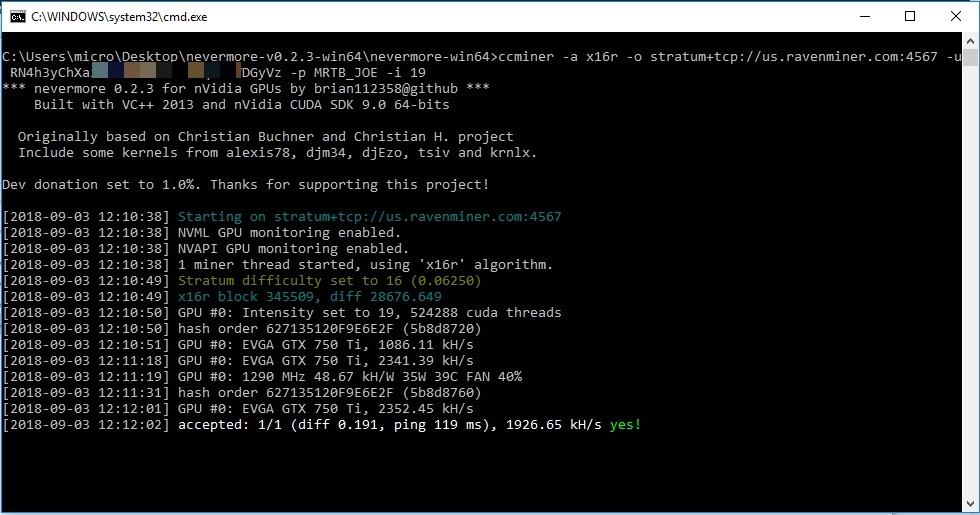
Starting up the program
So I started up the miner program on my PC by double clicking the START.bat file. The following nevermore miner window will open. This will show me that its running and solving blocks. It will show the current hashrate of the card and power along with temp.
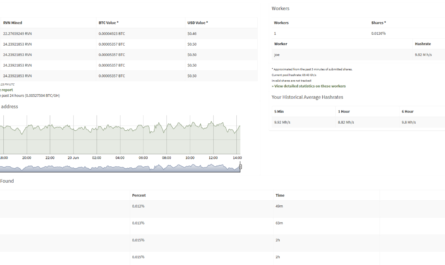
Once I have the miner running I can also go to the Ravenminer.com website and click on the wallet tab up top. Then enter my ravencoin receiving address I used, and I can see the stats for my miner along with payout information.
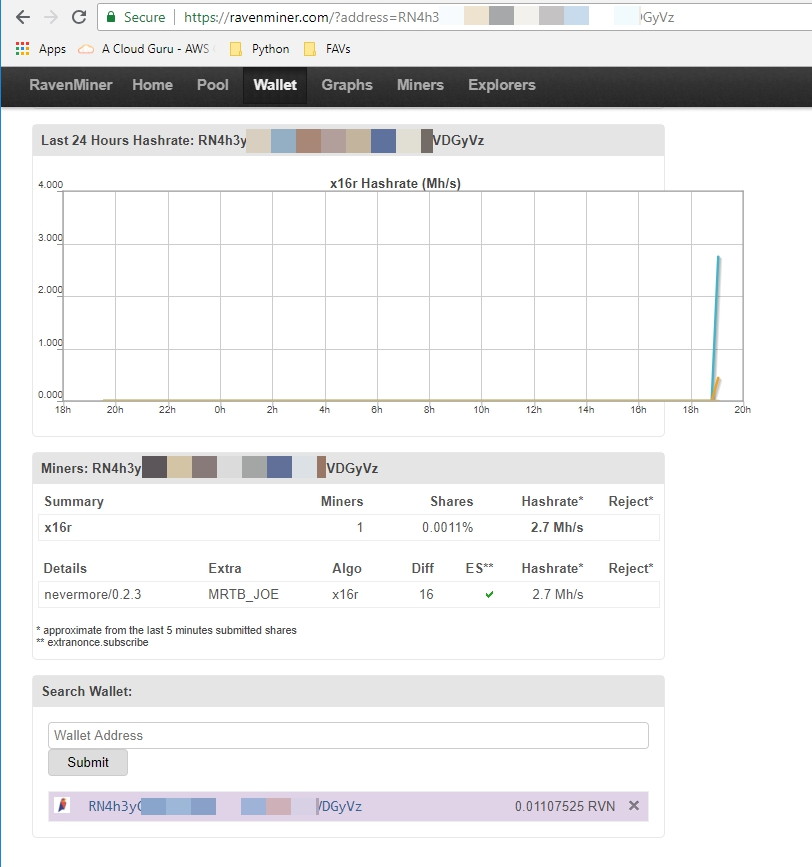
Once I accumulate enough coins for a payout it will be sent to my ravencoin wallet from the pool. Ravenminer is currently paying out once you reach 5 coins every 3 hours per the website. And at least once a week for balances over .5 raven.
That’s it! Your mining Ravencoin!
For a mining rig it is basically the same process but you specify how many cards to use in the config. Its really pretty simple.
One extra tip. I also use MSI Afterburner which is a free program for overclocking and power settings. With Ravencoin I don’t really need to overclock, but I do like to reduce the power settings. I run all my nvidia GTX 1060, and GTX 1070’s at 65% to 70% power. I do not see much loss in hashrate or ravencoins earned, but it does save a lot on power.
Here are a couple more posts I have made on Ravencoin in case your interested.
Mining Ravencoin with Nvidia video cards (my mining rig)
Mining Ravencoin with a GTX 750 ti
How to add a view only address to your Ravencoin QT wallet
I hope that helps. Also here is a link to the Bitcoin talk forum on ravencoin that has a ton of extra info.